
How to flood sugar cookies
Outline, fill, guide, and dry: a calm first lesson in smooth icing.
Practice on 4–6 cookies; allow complete drying
Cooled cookies, prepared royal icing made with an appropriate meringue powder, two small bowls, water, a spoon, piping bags, a small round tip, and an adult-managed scribe or toothpick.
Begin with two consistencies
Keep a portion of icing thick enough to pipe a line that holds its shape. Thin another portion gradually with tiny additions of water for filling. Stir gently to avoid extra bubbles. Product recipes and room humidity differ, so test a small amount rather than pouring in water.
Check a ribbon of flooding icing
Lift the spoon and let a ribbon fall into the bowl. It should settle back into the surface rather than remain a mound or disappear instantly. Around 10–15 seconds is a practical starting test, not a universal rule. The small-cookie test is more useful than chasing an exact number.
Pipe a border inside the edge
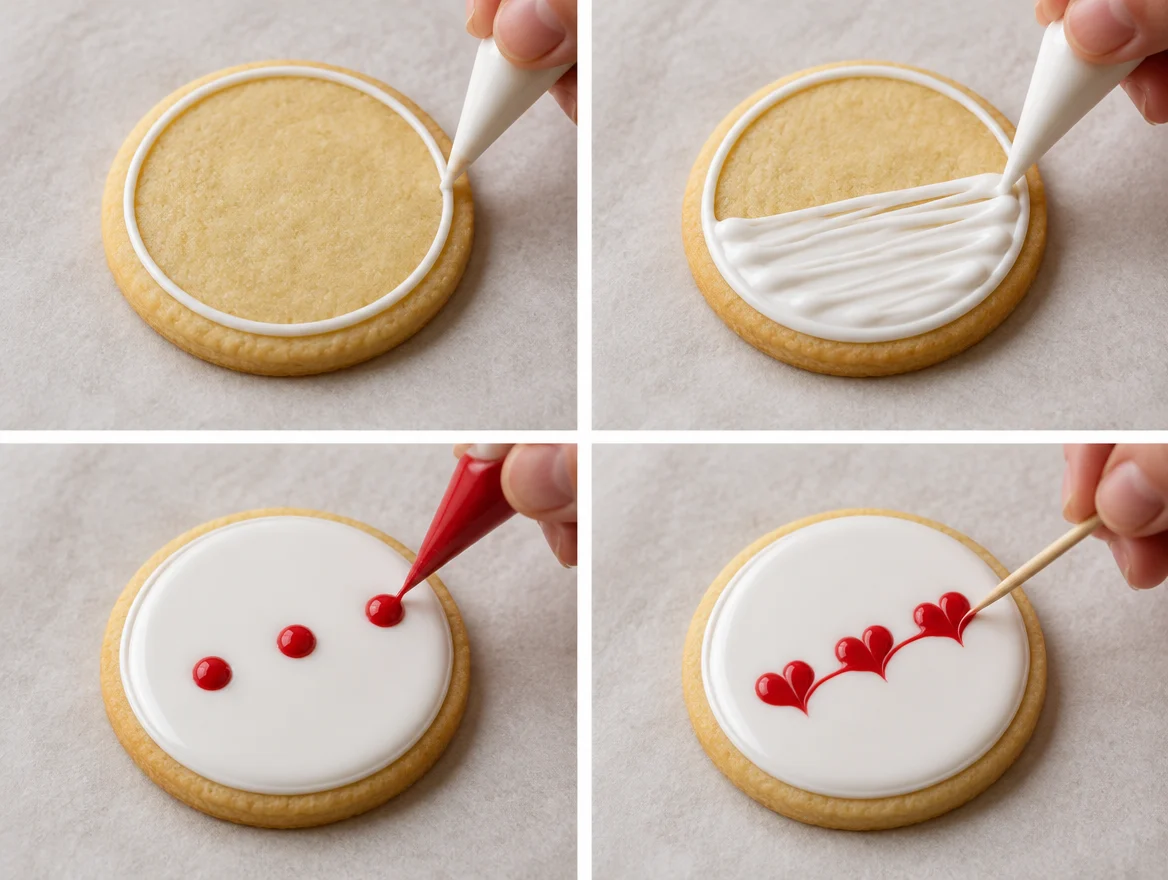
Practice first. Pipe an unbroken outline just inside the cookie’s edge so icing has room to settle without falling off. Let the outline set enough to hold the filling. Repair gaps before you flood.
Fill without overfilling
Pipe a little thinner icing inside the border and gently guide it into corners. Add only what the area needs. A grown-up can use a food-safe scribe or toothpick to pop visible bubbles; keep sharp tools out of young children’s hands.
Choose wet-on-wet or raised details
While the fill is still wet, add dots or stripes of the same consistency for a flat pattern. An adult can drag a clean point through dots to form hearts. For raised lettering or borders, wait until the base has set. Keep colors few while learning.
Let the cookie dry all the way
Leave cookies level in a protected, clean area according to your icing recipe. Plan overnight or up to 24 hours when needed; humidity and thick layers can take longer. Do not stack just because the top feels crusted. Test a spare cookie before packaging.
Try one little thing.
Make one plain white flooded cookie and one dotted cookie. Photograph the difference between wet and fully dry icing.
Choose a printable for the adventure →